Lesson
4: Fiber Optic Splicing
Objectives:
From this lesson you should learn:
How to concatenate* fibers by splicing
Mechanical
splicing
Fusion splicing
Mass (ribbon)
splicing
*Concatenate is a term used to describe the process of
joining two fibers together.
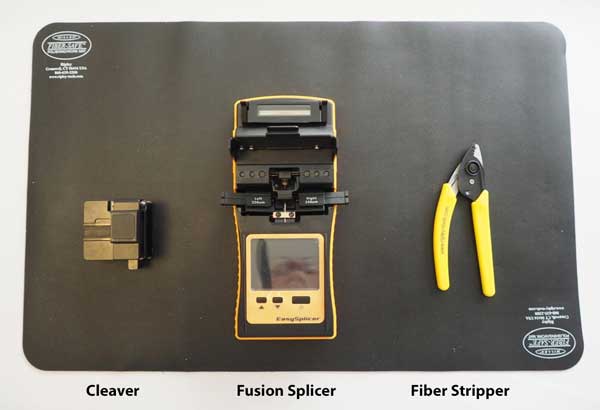
Tools
And Components Needed
Fiber
stripping tools
Fiber to splice (if at least one is a long pigtail, it
will make testing splices easier)
Mechanical splices
Fusion splicer
Introduction
Splicing is used to concatenate fibers when joining two
cables or terminating cables with factory made pigtails (a
cable with a connector on one end.) Mechanical splicing
uses a small alignment device and index matching gel.
Fusion splicing welds fibers together in an electrical
arc. Mass fusion splicing or ribbon splicing uses fusion
splicing techniques on a dozen fibers or more at one time.
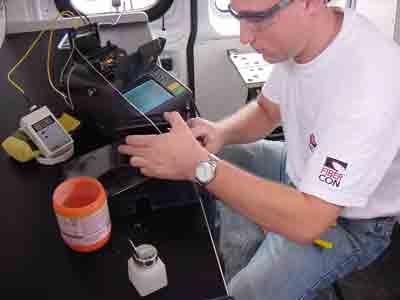
Splice tech working
onsite in a trailer.
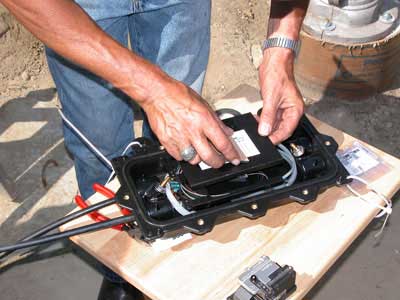
Placing spliced fibers
in a splice closure.
The secret to a good splice is good cleaves. Unless the
cleave is good, the joint between the two fibers cannot be
made properly. Fusion splicers come with high-quality
cleavers but some mechanical splice kits use inexpensive
cleavers that require practice to make good cleaves. (3M
has an interesting low-cost cleaver that is included in
their kits that uses a diamond wire to cleave the fibers.
You use it about 100 times then discard it. Video
on the 3M disposable cleaver.) Investing in a good
cleaver will make a big difference in the quality of the
splices you make.
Both fusion splicing types seal the fused fibers in a
sealed protector. Spliced fibers are placed in a splice
tray which is in turn placed in a splice closure. Besides
practicing cleaving, you should practice placing buffer
tubes and fibers in trays and closures.
Work in a space where you will not be disturbed and avoid
distractions. It is important you concentrate on the
exercises and follow each step carefully. Allow plenty of
time to complete the exercises without interruption.
Safety
 |
Please
Note: This is not the usual online
course - it is intended to guide you as
you learn new skills - the "hands-on"
skills needed to install optical fiber
cable plants. It involves using tools
and components in a realistic manner.
Some of the processes here can be
hazardous, like working with sharp
scraps of optical fiber and chemicals.
In
Lesson 1 you should have familiarized yourself
with the safety procedures - follow them all
the time. Do not work with fiber without eye
protection and a proper work area that is easy
to clean up.
Always wear safety glasses when doing
any of these exercises and dispose of
all scraps properly. |
As
part of Lesson 1, you should have watched the FOA
YouTube Video:
FOA Lecture 2: Safety When Working
With Fiber Optics
Download
a FOA safety poster for your work area.
Background
Review
This "skills" course assumes you have
knowledge of fiber optic splicing. If you are new to
fiber optics, you review the FOA
Guide section on Termination and Splicing or
should complete the Fiber
U Basic Fiber Optics: Termination and
Splicing
course before attempting the hands-on exercises
here.
Note: There
are many videos showing the installation practices for
splice closures on the web, especially on YouTube. The
recommended ones are from manufacturers like Corning, PLP
(Preformed Line Products), Tyco, 3M, etc. who are using
video to show how to use their products. You can
find them by links from the manufacturer's website or
searching YouTube or the Internet generally.
Hands-On
Lab Instructions
Download the Workbook section on Splicing and the VHO
tutorials on splicing linked below. Watch the videos
and/or read the references on the termination types you
have available for practice. The VHO
"Virtual Hands On" Tutorials take a "step-by-step"
approach to the hands-on processes covered in this
self-study program and the videos will show the
processes in motion. They are both a good way to teach
yourself the processes here - watch the video for the
overview then follow the steps in the VHO web pages.
Hands-On
Assignments:
After reading the workbook section and VHO
tutorial and watching the videos, complete these
exercises using all the cable types available to you.
As you finish each section, fill in the worksheet
in the back of the Workbook on Splicing. Your
completed worksheets are the records of your having
successfully completed the exercises.
Arrange
all your tools, components and other items on your
work table. Using a black mat (black Naugahyde works
well) makes it easier to see the fiber when working.
Fill in the worksheets at the end of
the Workbook section on Splicing as you complete the
tasks.
1. Mechanical Splicing
Video: Mechanical
Splicing VHO: Mechanical
Hands-on lab using crimp splice.
Using
a mechanical splice, splice two fibers. Use a visual fault
locator to optimize the splice. Cleave and repeat several
times.

2. Fusion Splicing
(Single Fiber)
Video: Fusion
Splicing VHO:
Fusion
splicing - single fiber
Detailed sequential instructions for EasySplicer
(shown above)
Using
a fusion splicer, splice two fibers and install splice
protector. If you can, test with an OTDR. Try the VFL on
the fusion splice. Notice the difference between the
fusion splice and the mechanical splice when using the
VFL.

3. Ribbon Splicing (Mass
Fusion Splicing)
VHO:
Ribbon
Splicing
Ribbon (mass) fusion splicing. If you have access to a
ribbon splicer and ribbons of fiber, splice those fibers.
If you have an OTDR and enough fiber to use it, check your
splices with the OTDR. Compare the results of the splices
for each fiber in the ribbon.

4. Placing Splices In
Splice Trays and Closures
After splicing, place the splices in splice trays and then
place the trays in splice closures. There are many types
of splice closures, so giving directions is difficult.
However, the normal way these are used is the loose tube
cable is spliced with one tube per splice tray for each
cable being spliced and up to 12 fibers, the normal
maximum per tube, spliced in each tray.

There are many videos showing the installation practices
for splice closures on the web, especially on YouTube. The
recommended ones are from manufacturers like Corning, PLP
(Preformed Line Products), Tyco, 3M, etc. who are using
video to show how to use their products.
Have
you completed the Workbook worksheets that are the
records of your having successfully completed the
exercises?
Test Your Comprehension - Online
Quiz On Splicing
- Next: Lesson
5: Fiber Optic Termination (Connectors)

Get a "Certificate
of Completion" When You Complete The Course
After you complete complete all six lessons of the Fiber U Basic Skills Lab
Fiber Optics online self-study course, you can
now take an online exam and, when you pass the
exam, get a "Certificate of Completion" for this
course. You should complete all lessons
including taking the quiz ("Test Your
Comprehension") at the end of every lesson. When
you think you are prepared, you can take an
online exam for a nominal fee ($20) which will
give you a "Certificate of Completion" for
this course.
Take the Test to Get Your
Certificate of Completion For This
Course
Return
to Lesson Plan
|