Lesson
5: Fiber Optic Termination (Connectors)
Objectives:
From this lesson you should learn:
How to identify common fiber optic connectors
How to install connectors using several methods
Adhesive/polish
(epoxy, anaerobic and Hot Melt)
Prepolished/Splice
Singlemode fiber polishing
Prepolished/splice
w/mechanical splice (requires special tools)
Fusion
splice-on connector (SOC) (requires
fusion splicer and accessories)
Tools
And Components Needed
Fiber
stripping tools, crimper, Kevlar scissors, etc. or a
termination toolkit
Polishing plate, pad, puck and film (12, 3 and
0.3-1micron)
Fiber to splice, preferably a simplex cable or half a
zipcord
Download
the list of tools and components needed
or refer to the CFOT
Certification Lab Manual
Introduction
Termination
refers to the process of installing connectors on the ends
of a fiber or fibers in a fiber optic cable. Over the
history of fiber optics, there have been over 100
different types of fiber optic connectors designed using
at least a dozen ways of attaching the connector to the
fiber. Today, factory made connectors use heat-cured epoxy
connectors that are generally polished on a machine. Field
termination may use adhesive/polish techniques with either
heat-cured epoxy, room temperature cured epoxy, anaerobic
adhesives or HotMelt ( a 3M product name) or
prepolished/splice connectors which have a short stub of
fiber inside the connector that are attached with
mechanical or fusion splices.
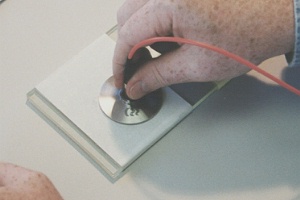
Polishing an
adhesive/polish connector.
The purpose of this lesson is to show you how to install
connectors using the most popular methods. It is
recommended that everyone do at least one of the
adhesive/polish connectors and one prepolished/splice
connector type.
We have provided step-by-step instructions you can follow.
If possible, get instructions from the manufacturer of the
connectors or the tool kit you
are using and follow them as each manufacturer's
connector may have some subtle differences.
Work in a space where you will not be disturbed and avoid
distractions. It is important you concentrate on the
exercises and follow each step carefully.
Allow plenty of time to complete the exercises without
interruption, especially this one on termination. During
the termination exercise, you will use adhesives which
must be used quickly.
Safety
 |
Please
Note: This is not the usual online
course - it is intended to guide you as
you learn new skills - the "hands-on"
skills needed to install optical fiber
cable plants. It involves using tools
and components in a realistic manner.
Some of the processes here can be
hazardous, like working with sharp
scraps of optical fiber and chemicals.
In
Lesson 1 you should have familiarized yourself
with the safety procedures - follow them all
the time. Do not work with fiber without eye
protection and a proper work area that is easy
to clean up.
Always wear safety glasses when doing
any of these exercises and dispose of
all scraps properly. |
As
part of Lesson 1, you should have watched the
FOA YouTube Video:
FOA Lecture 2: Safety When
Working With Fiber Optics
Download
a FOA safety poster for your work area.
Background
Review
This "skills" course assumes you
have knowledge of fiber optic
termination. If you are new to fiber
optics, you review the FOA
Guide section on Termination and
Splicing or should complete
the Fiber
U Basic Fiber Optics:
Termination and Splicing
course before attempting the hands-on
exercises here.
Hands-On
Lab Instructions
Download
and read the Workbook termination and the VHO
tutorials on termination for the types of
terminations you will be doing linked below.
Watch the videos and/or read the VHO Tutorials on
the termination types you have available for
practice or are interested in learning. The VHO
"Virtual Hands On" Tutorials take a "step-by-step"
approach to the hands-on processes covered in this
self-study program and the videos will show the
processes in motion. They are both a good way to
teach yourself the processes here - watch the
video for the overview then follow the steps in
the VHO web pages.
*Note: Everyone should study the VHO for
Epoxy/Polish connectors since this is the method
used for patchcords and cables terminated in
factories, representing the lmost common
termination type. The other types can be chosen
depending on personal interest.
Complete the exercises with the equipment you have
available following the steps in the appropriate
VHO Tutorial.
Hands-On
Assignments
After
reading the workbook section and VHO tutorial and
watching the videos, complete these exercises using all
the cable types available to you.
As you finish each section, fill in the worksheet in the
back of the Workbook on Termination. Your completed
worksheets are the records of your having successfully
completed the exercises.
Each of these exercises involves terminating a
tight buffer fiber or simplex fiber optic cable with a
common type of connector.
You should complete the exercises for the all the
components and tools available to you, although it
is recommended that you learn how all these methods
are done to understand the complete process of fiber
optic termination.
Before
starting the hands-on exercises, we recommend you
read these pages in addition to the Workbook
section and the VHO tutorial:
Adhesive/polish
connectors
Hints For Adhesive/Polish Connector Terminations

Arrange all your tools, components and other
items on your work table. Using a black mat (black
Naugahyde works well) makes it easier to see the fiber
when working.
Epoxy and anaerobic adhesive techniques use the same
connector type, the basic ceramic ferrule connector. The
3M HotMelt connector is only made by 3M and will require
the 3M connectors and oven. Prepolished/splice
connectors are available from many manufacturers but
will generally require the termination kit from that
particular manufacturer.
We
recommend starting with either SC or ST connectors with
a 2.5mm ferrule as they are somewhat easier to terminate
than the smaller 1.25mm ferrule of the LC. After
mastering the techniques, try the LC connectors with
smaller ferrules.
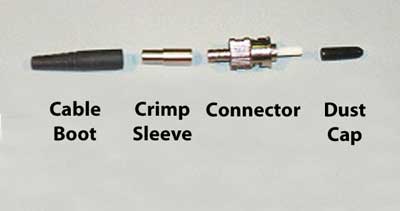
Parts of an ST
connector
Hint: Since it is preferred to be able to test
each connector as it is made, we recommend starting with
a long patchcord, say 5 meters long, then cut it in half
and attach your connector to the cut end. That allows
testing your connector as soon as it is made using the single-ended
(patchcord) test. Record all test data on your
connectors.
Adhesive/Polish
Connectors
Adhesive/polish connectors all have a
similar process (from left): strip the fiber to the
proper length, apply adhesive and insert the connector,
after the adhesive sets, cleave the fiber, air-polish to
remove most of the fiber stub, final polish on a flat
plate with a soft polishing pad.

Fill
in the worksheets at the end of the Workbook section
on Termination as you complete the tasks.
1. Epoxy/polish Connectors
Read: Adhesive/polish
connectors
- VHO:
Epoxy/Polish
Follow
the directions to terminate a fiber or simplex cable. The
8-part videos above give detailed instructions.
The VHO:
Epoxy/Polish web pages show step-by-step
instructions that are easy to follow.
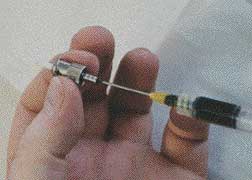
Epoxy must be injected
into the connector with a syringe.
Inject adhesive until it forms a small bead on the
connector ferrule. When this bead hardens, it supports and
protects the fiber during polishing to allow a better end
finish. This hardened bead of epoxy means the yield of
epoxy/polish connectors is nearly 100%. Thus epoxy/polish
connectors have the highest yield, best reliability and
lowest loss of any termination type.
Inject epoxy until you
see a small bead of the adhesive on the end of the
ferrule.
Many novices think
epoxy connectors take too much time - it does take 5-10
minutes to cure epoxy in an oven. But if you are
terminating more than one connector, the first connector
goes into the oven and will be ready by the time the
second or third connector goes in the oven, so the curing
time is irrelevant.
Epoxy
usually only has a 30 minute life once mixed. If you are
working with others, you can share the epoxy to be more
efficient.
If you have a curing oven, the epoxy will cure in 5-10
minutes. Room-temperature curing epoxy will need to be
left overnight.
2.
Anaerobic /polish Connectors
Read:
Adhesive/polish
connectors
VHO:
Anaerobic
Several
methods are used for applying an adhesive and some use
an “accelerator” or chemical thatmakes the adhesive
set instantaneously. These methods are:
- Inject
adhesive into the connector and dip the prepared fiber
end into the acceleratorbefore inserting it in the
connector. One must work quickly as the adhesive sets
in 30 seconds or so, so if trouble getting the fiber
intothe connector is encountered, the adhesive may set
before the fiber is fully inserted.
- Inject
adhesive into the connector and then insert the
prepared fiber end into the connector. Spray or drop
theaccelerator on the protruding fiber and move the
fiber back and forth to spread the accelerator inside
the connector ferrule. It should set in ~30 seconds.
- Wipe
the fiber with the adhesive and insert it in the
connector. With noaccelerator, the adhesive will set
in 4-5 minutes and be much stronger. If instant
adhesion is required, spray or wipe accelerator on
theprotruding fiber as above.
The original method developed decades ago was to inject
the adhesive in the connector then dip the prepared
fiber in the accelerator and insert it. The problem with
this method was the adhesive would set so fast that
often one could not get the fiber fully inserted in the
connector before the adhesive hardened, requiring the
connector to be discarded. Try this method also to see
if it works for you.
When cleaning fibers for anaerobic connectors (or any
connector for that matter), NEVER use regular medical
alcohol or alcohol pads. The 30% water content makes the
adhesive take much longer to cure (if it ever cures) and
makes the bond to the connector ferrule less strong.
-
-
3. 3M HotMelt
Connectors:
Read:
Adhesive/polish
connectors
VHO: Hot
Melt
Follow the directions to terminate a fiber or
simplex cable. The VHO gives detailed
instructions.
VHO:
Hot
Melt
HotMelt
connectors use an adhesive that is applied to the
connector at the factory and is then heated up to
liquify it to allow insertion of the stripped and
cleaned fiber. The connector is then set aside to cool
and set for several minutes before the fiber can be
polished.
For this exercise, you will need a special 3M Hotmelt
oven. HotMelt ovens use a much higher temperature than
epoxy overs, so they are not used for any other purpose
- the high temperature will ruin epoxy.
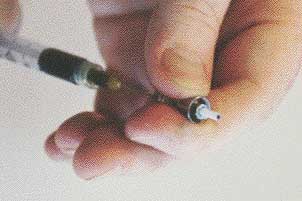
Inserting a HotMelt
connector in a 3M oven
One advantage of the HotMelt connector is you may be
able to reuse them. If you break the fiber or have
problems in the cleaving or polishing process, you can
heat the connector up and remove the fiber and try
again. Or you can strip the fiber ~3mm (1/8") longer and
after inserting it fully, pull it back 3mm and let it
set. If you have problems with cleaving
or polishing, reheat the connector, push the fiber
fully in, let it cool and try again.
4.
Prepolished/Splice Connectors

- Read:
Prepolished/splice
connectors
- VHO:
Pre-Polished
Splice& SOC
Hands-on
lab with step-by-step directions
Follow
the directions to terminate a fiber or
simplex cable. The VHO gives detailed
instructions. VHO:
PPS
Termination
Prepolished/splice connectors are connectors with a
short fiber stub already installed in the connector
and polished, allowing the connector to be installed
on a fiber using a splice. The splice has
traditionally been a mechanical splice but fusion
splices are now available for use with some
connectors, sometimes requiring special splicing
machines, sometimes regular fiber splicers.
Each manufacturer's prepolished/splice connector is
slightly different. It is important to follow their
instructions exactly to get good results.
The most important issue with any prepolished/splice
connector is to ensure the fiber is cleaved
properly. Many kits for these connectors provides
only a simple, cheap cleaver that looks like a
stapler. If used properly, these cleavers can
provide adequate cleaves, but they require practice
and a technique that not every tech can master. More
expensive cleavers such as those used for fusion
splicing are recommended to prevent problems.
Remember that a poor cleave will not only cause high
loss, it usually causes the need to cut off and
discard an expensive connector.
5.
Fusion Splice-On Connectors (SOC)

- Read:
Prepolished/splice
connectors
- VHO:
Pre-Polished
Splice& SOC, Detailed
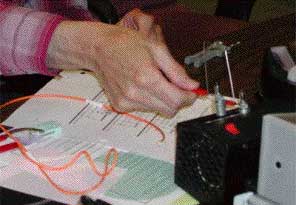
sequential instructions on installing a SOC using
the EasySplicer
(shown above.)
The SOC is a
prepolished connector made in a factory with a short
length of cleaved fiber that is fusion spliced onto the
fiber being terminated. The SOC process is
straightforward, much like fusion splicing. Strip the
fiber, cleave it with a fusion splice cleaver, place the
connector in the fixture in the splicer, fuse the fibers,
shrink a protector over the splice and place the boot on
the connector.
Each
manufacturer's SOC is slightly different. It is important
to follow their instructions exactly to get good
results.
6.
Singlemode Polishing: Follow
the directions to terminate a
fiber or simplex cable. The VHO
gives detailed instructions.
Read:
Singlemode
fiber termination
VHO: Singlemode
Not
many techs attempt field installation of singlemode
connectors using adhesive/polish techniques. It is very
hard to get low loss and especially reflectance with
hand-polished SM connectors so most are factory
terminated on a pigtail which is fusion spliced onto the
fiber in the field. Furthermore, most SM connectors are
tested with an interferometer to verify the quality of
the end finish. However we offer instructions to those
who want to learn how to polish SM connectors.
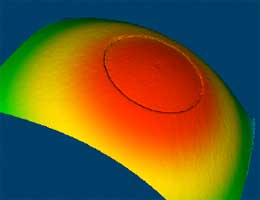
Interferometer test of a
SM connector
If
you do not have access to an interferometer but want to
know how good your connectors are, use a reflectance test
to check them. Read: Reflectance
Testing
Have
you completed the Workbook worksheets that are the
records of your having successfully completed the
exercises?
Test
Your Comprehension - Online
Quiz On Termination
- Next: Lesson
6: Fiber Optic Testing

Get a "Certificate
of Completion" When You Complete The Course
After you complete complete all six lessons of the Fiber U Basic Skills Lab
Fiber Optics online self-study course, you can
now take an online exam and, when you pass the
exam, get a "Certificate of Completion" for this
course. You should complete all lessons
including taking the quiz ("Test Your
Comprehension") at the end of every lesson. When
you think you are prepared, you can take an
online exam for a nominal fee ($20) which will
give you a "Certificate of Completion" for
this course.
Take the Test to Get Your
Certificate of Completion For This
Course
Return
to Lesson Plan
|